Preparing for Eau by TUSHY installation dayUpdated 4 days ago
Congrats on your upgrade! Here's a big-picture look at what installation day will look like so you're not caught off guard.
Before your plumber arrives:
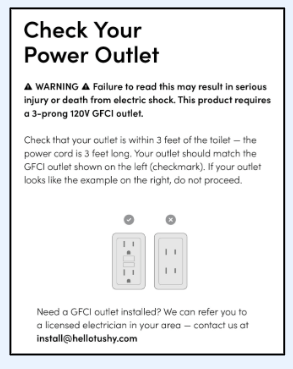
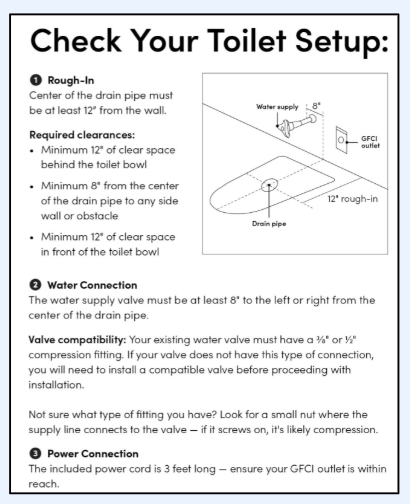
Confirm you have a GFCI outlet within 3 feet of the toilet. If not, get an electrician in first.
2. Unbox everything and confirm all parts are included (see: What's Included with the Eau?).

3. Measure your rough-in (wall to center of floor bolts on your current toilet) — it should be 12".
4. Clear the path from your front door to your bathroom. Two people are required, as it weighs 99 pounds and cannot be safely moved alone. The Eau is a full toilet — it's heavy!
5. Inspect your Eau by TUSHY before installing.
Carefully inspect the toilet for any cracks, chips, or damage to the porcelain before beginning installation. If you notice any damage before installation, please STOP immediately. Do not proceed with installing the toilet. Cracks, chips, or other defects may worsen during installation and can lead to leaks, improper fit, or complete breakage.
Instead, contact us right away so we can assess the issue and arrange a replacement if needed.
⚠ Report damage within 3 days of delivery and before installation, and include the following:
- Clear photo(s) or video showing the damage
- Photo of the product label showing the serial number (located on the right side of the toilet base)
- Order number
- Your full name
- Email used to place the order
- Phone number
Once damage is verified as warranty-eligible, we will arrange a replacement. Damage reported after installation or outside the 3-day window will not qualify for warranty replacement.
If your Eau by TUSHY looks good and has no issues, you’re all set—let’s move forward with installation.
What your plumber will do:
- Turn off the water supply to your current toilet.
- Flush to empty the tank, then disconnect and remove your existing toilet.
- Inspect the floor flange and install the included 3.5" flange if needed.
- Set the wax ring and lower the Eau into place.
- Bolt the Eau to the floor.
- Connect the water supply via the included T-adapter (with built-in filter).
- Connect the power cord to the GFCI outlet.
- Turn the water back on and test for leaks.
- Do a happy dance. (Optional but encouraged.)
After installation:
- Load your Cloud Spray bottle into the foam dispenser slot
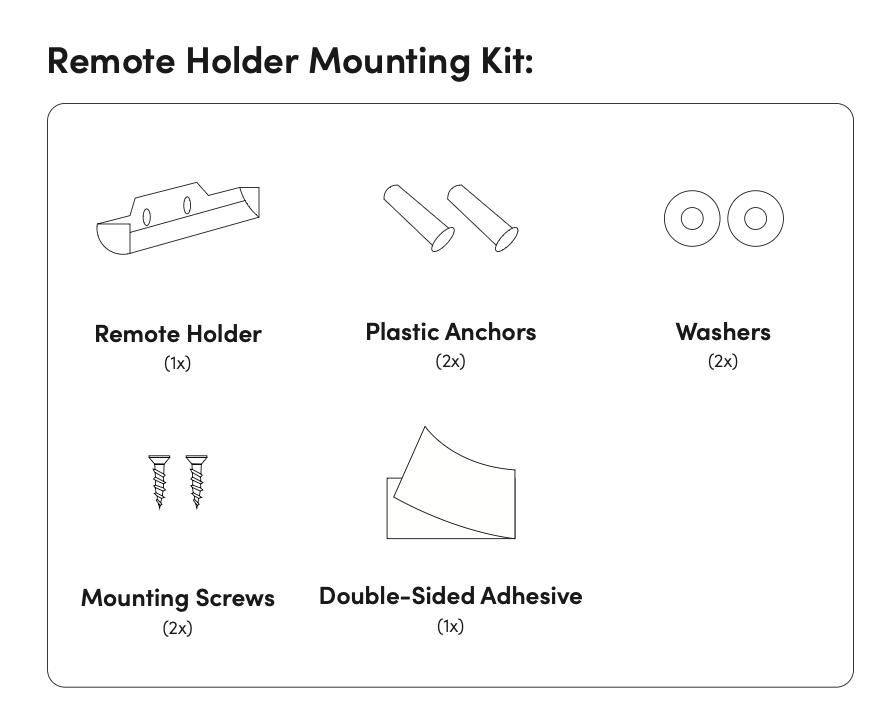
- Pop the batteries into your remote.
- Mount the remote wall holder at a convenient height near the toilet.
- Walk through the settings using the remote or side knob.
That's it! Welcome to the future of clean. 🚽✨
If anything doesn't go as planned, contact our Poo-Rus, and we'll help troubleshoot.